Mail: Difference between revisions
→Spamfiltering: - I before E except after C |
|||
| (16 intermediate revisions by 5 users not shown) | |||
| Line 1: | Line 1: | ||
Mail services are currently handled by [[Machine_List#mail|the mail container]] on [[Machine_List# |
Mail services are currently handled by [[Machine_List#mail|the mail container]] on [[Machine_List#xylitol|xylitol]]. |
||
== Reading your mail == |
== Reading your mail == |
||
| Line 25: | Line 25: | ||
** Port: 25, 465, or 587 |
** Port: 25, 465, or 587 |
||
== |
== Mail Filtering == |
||
Mail filtering allows you to automatically organize mails into different places, like putting potential spam mail into Junk folder, or to put notifications into a separate folder to make your inbox clean. |
|||
Mail filtering can be done by writing a sieve script. Traditionally mail filtering is done through procmail, but it's currently being phased out due to its complex syntax and unmaintained state. |
|||
By default, we do not run any Bayesian Spamfilters on user email, as they stand a chance of false-positives leading to users not receiving legitimate mails. However, you can configure procmail (the application that postfix calls to deliver any mail that it received to the user that it was sent to) to pipe your message through spamassassin, and then optionally place it in special folders and/or delete it based on its spam score and/or whether it got flagged as spam or not. In order to do this, you need to configure procmail via .procmailrc in your home directory. An example such .procmailrc is below: |
|||
The easiest way to do it is to use the Filters setting on our [https://mail.csclub.uwaterloo.ca Webmail]. You can either edit with the GUI, or import a script. A simple script that puts suspected spam into "Junk" and puts syscom emails into "Mailing List" folder looks like this: |
|||
<pre> |
|||
require ["fileinto"]; |
|||
# rule:[Spam] |
|||
if allof (header :contains "X-Spam-Level" "******") |
|||
{ |
|||
fileinto "Junk"; |
|||
} |
|||
# rule:[Mailing List] |
|||
if anyof (header :contains "list-id" "syscom.csclub.uwaterloo.ca", header :contains "list-id" "syscom-alerts.csclub.uwaterloo.ca", header :contains "list-id" "ceo.csclub.uwaterloo.ca") |
|||
{ |
|||
fileinto "Mailing List"; |
|||
} |
|||
</pre> |
|||
For more advanced use of sieve check out [https://doc.dovecot.org/2.3/configuration_manual/sieve/examples/ Pigeonhole Sieve examples - Dovecot]. |
|||
== Mail User Agents == |
|||
Here are instructions on how to access your CSC email using some common Mail User Agents (a.k.a. "email clients"). |
|||
=== Apple Mail === |
|||
Open the Mail app. On the Menu Bar, click on 'Mail', then 'Add account'. |
|||
[[File:Apple_mail_select_account_provider.png|300px]] |
|||
Select 'Other mail account', then 'Continue'. |
|||
[[File:Apple_mail_add_a_mail_account.png|300px]] |
|||
Fill in your real name, your CSC email address (should be watiam_id@csclub.uwaterloo.ca), and your CSC password. Click 'Sign in'. |
|||
[[File:Apple_mail_imap_details.png|300px]] |
|||
You will get an error saying 'Unable to verify account name or password'. Fill in the details as shown above, then click 'Sign in'. |
|||
Make sure to specify your WatIAM username as the username, and use <code>mail.csclub.uwaterloo.ca</code> for the incoming/outgoing |
|||
mail servers. |
|||
[[File:Apple_mail_select_apps_to_use_with_account.png|300px]] |
|||
Finally, check 'Mail', and click 'Done'. |
|||
[[File:Apple_mail_mailboxes_button.png|200px]] |
|||
If you had an existing Mail account, you will need to click on the 'Mailboxes' button to see your CSC account. There will be a dropdown |
|||
button beside 'Inboxes' on the left hand side where you can toggle between different inboxes. |
|||
=== Windows Mail === |
|||
<b>Note</b>: Windows Mail can be <i>very</i> slow some times. I have no idea why. If you're looking for a decent email client on Windows, I strongly suggest using Thunderbird or Evolution instead. |
|||
Open the Mail app (as of this writing, 2021-04-23, its icon is a blue envelope). Click on 'Accounts' on the left hand side, then click on the '+ Add account' button. Select 'Advanced setup': |
|||
[[File:Windows_mail_choose_account_type.PNG|300px]] |
|||
Then choose 'Internet email': |
|||
[[File:Windows_mail_advanced_setup_type.PNG|300px]] |
|||
Here are some of the settings you'll need (replace your username, address, etc.): |
|||
[[File:Windows_mail_internet_account_info_1.PNG|400px]] |
|||
Here are the rest: |
|||
[[File:Windows_mail_internet_account_info_2.PNG|400px]] |
|||
Then click 'Sign in'. It may take you a <i>very</i> long time to connect for the first time, especially if Windows is doing one if its dreaded updates in the background. If it's still hanging after a few hours, it might be a good idea to close the window and try again. |
|||
Once you're signed in, you should be able to see your CSC account in the Mail app on the left hand side. |
|||
=== Gmail (SMTP Relay) === |
|||
It is possible to [https://support.google.com/mail/answer/6304825 link third-party email accounts to Gmail]. Here's one way to do it. |
|||
Login to Gmail, go to Settings, and then under 'Accounts and Import', click 'Add another email address'. |
|||
[[File:Gmail_settings_accounts_1.png|800px]] |
|||
Fill in your real name and CSC email address (should be watiam_id@csclub.uwaterloo.ca). I would suggest unchecking the 'Treat as an alias' |
|||
box unless you want your CSC and Gmail addresses to be treated the same. See more info [https://support.google.com/a/answer/1710338 here]. |
|||
[[File:Gmail_add_another_email_address_you_own.png|600px]] |
|||
Fill in your CSC username and password: |
|||
[[File:Gmail_add_account_credentials.png|600px]] |
|||
Google will send a confirmation email to your CSC address. Either click on the link in the email or enter the confirmation code. |
|||
[[File:Gmail_add_address_confirmation.png|600px]] |
|||
If you return to Gmail, you should now see your CSC account under your settings. I suggest selecting the 'Reply from the same address the message was sent to' |
|||
option. |
|||
[[File:Gmail_settings_accounts_2.png|800px]] |
|||
Now, if you click on the 'Compose' button on the left hand side, you should be able to select your CSC address as the sender. |
|||
[[File:Gmail_choose_sender.png|600px]] |
|||
If you want to receive your CSC messages via Gmail, just append your Gmail address to the end of the <code>.forward</code> file in your home directory on the CSC servers (it needs to be on a new line). |
|||
=== Outlook Desktop === |
|||
This is probably the world's most powerful email client, but you need to jump through a lot of hoops to setup your CSC email with it. Luckily I've done those for you so just follow these steps: |
|||
[[File:Ol1.png|600px]] |
|||
Open Outlook and click File at the top left. |
|||
[[File:Ol2.png|600px]] |
|||
Click Account Settings and then Manage Profiles. |
|||
[[File:Ol3.png|600px]] |
|||
Click Email accounts... |
|||
[[File:Ol4.png|600px]] |
|||
Click New... |
|||
[[File:Ol5.png|600px]] |
|||
Enter your name, CSC email and password. If you have an email alias, don't use your alias, use your QuestID@csclub.uwaterloo.ca email. Click Next > |
|||
[[File:Ol6.png|600px]] |
|||
It will start searching for your account, this can take a minute or two. |
|||
[[File:Ol7.png|600px]] |
|||
Once it finishes configuring it you'll get a test email. |
|||
[[File:Ol8.png|600px]] |
|||
Uncheck Set up Outlook Mobile on my phone (unless you want to), and check Change account settings. Then click Next > |
|||
[[File:Ol9.png|600px]] |
|||
If you have an email alias, you can now change your email to that in the Email Address field. Don't change your logon info. You can click More Settings to change your mailbox name, or click Finish (setup is complete). |
|||
[[File:Ol10.png|600px]] |
|||
You can change the name here. That's it. I've provided the other two tabs' configs below just in case anyone (including future me) needs it. |
|||
[[File:Ol11.png|600px]] |
|||
[[File:Ol12.png|600px]] |
|||
=== Gnus === |
|||
Gnus is one of the MUAs built into GNU Emacs. Gnus is very powerful and flexible, and comes with several "backend"s out of the box for reading newsgroups, email, RSS feeds, and more. Over the years people have written many other backends for it as well. |
|||
To get started using Gnus for reading your CSC mail over IMAPS, you can start with the following simple configuration based on Gnus's <code>nnimap</code> backend: |
|||
<nowiki> |
<nowiki> |
||
(setq mail-user-agent 'gnus-user-agent |
|||
#Begin spamfilter-enabled procmailrc |
|||
read-mail-command 'gnus |
|||
SHELL=/bin/sh |
|||
gnus-select-method '(nnnil "") |
|||
PATH=/bin:/usr/bin |
|||
gnus-secondary-select-methods |
|||
LOGABSTRACT=all |
|||
'((nnimap "csc" |
|||
MAILDIR=$HOME/.maildir |
|||
(nnimap-stream tls) |
|||
LOGFILE=$MAILDIR/procmail.log |
|||
(nnimap-address "mail.csclub.uwaterloo.ca") |
|||
VERBOSE=off |
|||
(nnimap-user "abandali"))))</nowiki> |
|||
The <code>gnus-secondary-select-methods</code> variable set above is the most important bit. |
|||
#Spamassassin start |
|||
:0fw: spamassassin.lock |
|||
| /usr/bin/spamc |
|||
#Spamassassin end |
|||
For reference sake, here's how we can do client-side mail splitting in Gnus: say we want to move all messages with a <code>X-Spam-Flag</code> header of <code>YES</code> to the Junk folder; here's how we tell Gnus to do that: |
|||
:0: |
|||
* ^X-Spam-Status: Yes |
|||
<nowiki> |
|||
spam |
|||
(setq gnus-secondary-select-methods |
|||
#End spamfilter-enabled procmailrc</nowiki> |
|||
'((nnimap "csc" |
|||
(nnimap-stream tls) |
|||
(nnimap-address "mail.csclub.uwaterloo.ca") |
|||
(nnimap-user "abandali") |
|||
(nnimap-inbox "INBOX") |
|||
(nnimap-split-methods 'nnimap-split-fancy) |
|||
(nnimap-split-fancy |
|||
(| |
|||
;; move spam to Junk |
|||
("X-Spam-Flag" "YES" "Junk") |
|||
;; catch-all; leave everything else in inbox |
|||
"INBOX")))))</nowiki> |
|||
Gnus has a plethora of useful and complex features, and one cat get very fancy with it. But that is left as an exercise for the [https://www.gnu.org/software/emacs/manual/gnus.html interested reader]. :-) |
|||
== Technical Details == |
== Technical Details == |
||
=== Relay Server === |
|||
At some point IST started enforcing that everyone use their Relay server so we did, info on how we configured it can be found here; [https://uwaterloo.atlassian.net/wiki/spaces/FAST/pages/5212014152/Bulk+Automatic+Email+Configuration] |
|||
=== Mail Transfer (Incoming) === |
=== Mail Transfer (Incoming) === |
||
| Line 58: | Line 228: | ||
* zen.spamhaus.org RBL |
* zen.spamhaus.org RBL |
||
* Greylisting with |
* Greylisting with rspamd (see below) |
||
These filters reject truckloads of spam, preventing them from reaching your inbox. Greylisting adds a delay to mail delivery from unknown servers, but after a small number of successes they will be auto-whitelisted. If that isn't good enough, ask systems-committee@csclub.uwaterloo.ca to whitelist all mail to your address. |
These filters reject truckloads of spam, preventing them from reaching your inbox. Greylisting adds a delay to mail delivery from unknown servers, but after a small number of successes they will be auto-whitelisted. If that isn't good enough, ask systems-committee@csclub.uwaterloo.ca to whitelist all mail to your address. |
||
=== Spam filtering === |
|||
Before mail is delivered, it is sent to rspamd for spam checking. rspamd might greylist and/or add headers to the mail. rspamd WON'T reject the mail on its own. It is up to the user's filter to decide what to do based on the spam headers (usually put mails tagged as spam into a folder like Junk). |
|||
=== Mail Delivery === |
=== Mail Delivery === |
||
User mail is delivered |
User mail is delivered by LMTP to dovecot. This is configurable by adding a comma-separated list of destinations in $HOME/.forward. See aliases(5) for more details. |
||
Dovecot, in turn, runs the mail through user's sieve filter script (in $HOME/.maildir/sieve/ with the active filer symlink-ed to $HOME/.maildir/.dovecot.sieve). If no sieve script is found, Dovecot defaults to an internal sieve script, which pipes the mail though procmail to maintain compatibility with existing $HOME/.procmailrc scripts. You can write sieve scripts by hand, or use the graphical editor provided by https://mail.csclub.uwaterloo.ca, under Settings/Filters. |
|||
Procmail, in turn, writes mail to $HOME/.maildir unless instructed otherwise. You can customize procmail by editing $HOME/.procmailrc. See procmailrc(5) for more details. |
|||
Note that procmail compatibility might be removed in the future. |
|||
==== Failures ==== |
==== Failures ==== |
||
If you are out of quota or another error occurs writing to your home directory, |
If you are out of quota or another error occurs writing to your home directory, dovecot will deliver your message to /var/mail/$USER on the mail server. If that too fails, the server is probably on fire. The message will be returned to the queue where it will eventually bounce. |
||
==== Sieve/ManageSieve ==== |
|||
Dovecot also allows editing sieve scripts via ManageSieve protocol on 4190. |
|||
==== Forwarding ==== |
==== Forwarding ==== |
||
Latest revision as of 02:26, 11 August 2025
Mail services are currently handled by the mail container on xylitol.
Reading your mail
You can use any user agent that supports maildir locally (mutt, alpine, etc), and any client that supports IMAP either locally or remotely. We also have webmail.
Here are the details:
- maildir
- Location: $HOME/.maildir/
- POP3
- No longer supported.
- IMAP
- Hostname: mail.csclub.uwaterloo.ca
- Port: 143 (IMAP), 993 (IMAPS)
- SMTP
- Hostname: mail.csclub.uwaterloo.ca
- SSL encryption and authentication required
- Port: 25, 465, or 587
Mail Filtering
Mail filtering allows you to automatically organize mails into different places, like putting potential spam mail into Junk folder, or to put notifications into a separate folder to make your inbox clean.
Mail filtering can be done by writing a sieve script. Traditionally mail filtering is done through procmail, but it's currently being phased out due to its complex syntax and unmaintained state.
The easiest way to do it is to use the Filters setting on our Webmail. You can either edit with the GUI, or import a script. A simple script that puts suspected spam into "Junk" and puts syscom emails into "Mailing List" folder looks like this:
require ["fileinto"];
# rule:[Spam]
if allof (header :contains "X-Spam-Level" "******")
{
	fileinto "Junk";
}
# rule:[Mailing List]
if anyof (header :contains "list-id" "syscom.csclub.uwaterloo.ca", header :contains "list-id" "syscom-alerts.csclub.uwaterloo.ca", header :contains "list-id" "ceo.csclub.uwaterloo.ca")
{
	fileinto "Mailing List";
}
For more advanced use of sieve check out Pigeonhole Sieve examples - Dovecot.
Mail User Agents
Here are instructions on how to access your CSC email using some common Mail User Agents (a.k.a. "email clients").
Apple Mail
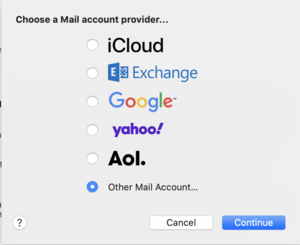
Open the Mail app. On the Menu Bar, click on 'Mail', then 'Add account'.
Select 'Other mail account', then 'Continue'.
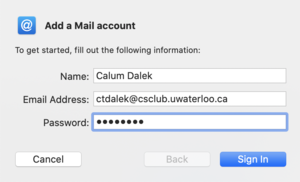
Fill in your real name, your CSC email address (should be watiam_id@csclub.uwaterloo.ca), and your CSC password. Click 'Sign in'.
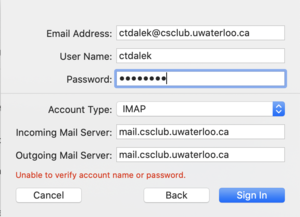
You will get an error saying 'Unable to verify account name or password'. Fill in the details as shown above, then click 'Sign in'.
Make sure to specify your WatIAM username as the username, and use mail.csclub.uwaterloo.ca for the incoming/outgoing
mail servers.
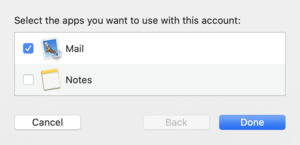
Finally, check 'Mail', and click 'Done'.
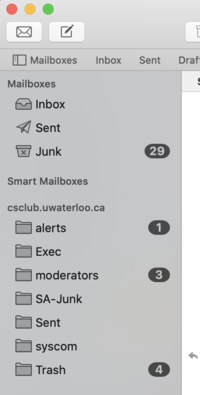
If you had an existing Mail account, you will need to click on the 'Mailboxes' button to see your CSC account. There will be a dropdown button beside 'Inboxes' on the left hand side where you can toggle between different inboxes.
Windows Mail
Note: Windows Mail can be very slow some times. I have no idea why. If you're looking for a decent email client on Windows, I strongly suggest using Thunderbird or Evolution instead.
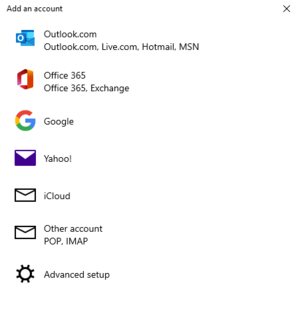
Open the Mail app (as of this writing, 2021-04-23, its icon is a blue envelope). Click on 'Accounts' on the left hand side, then click on the '+ Add account' button. Select 'Advanced setup':
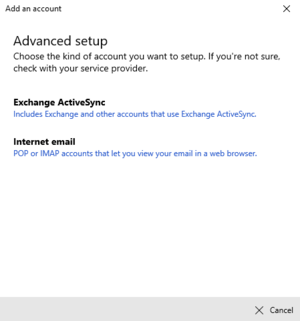
Then choose 'Internet email':
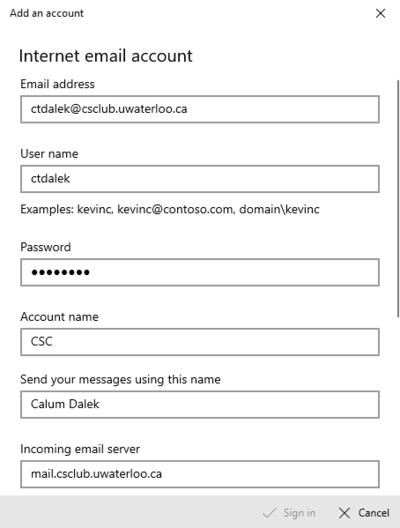
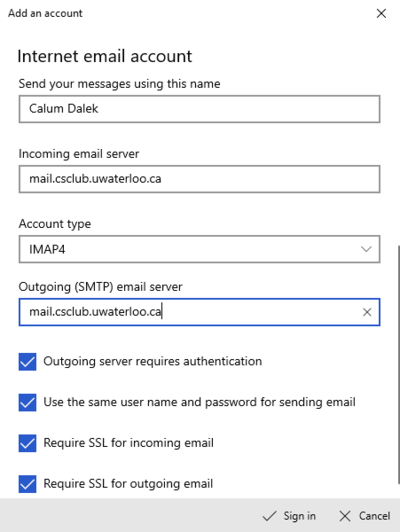
Here are some of the settings you'll need (replace your username, address, etc.):
Here are the rest:
Then click 'Sign in'. It may take you a very long time to connect for the first time, especially if Windows is doing one if its dreaded updates in the background. If it's still hanging after a few hours, it might be a good idea to close the window and try again.
Once you're signed in, you should be able to see your CSC account in the Mail app on the left hand side.
Gmail (SMTP Relay)
It is possible to link third-party email accounts to Gmail. Here's one way to do it.
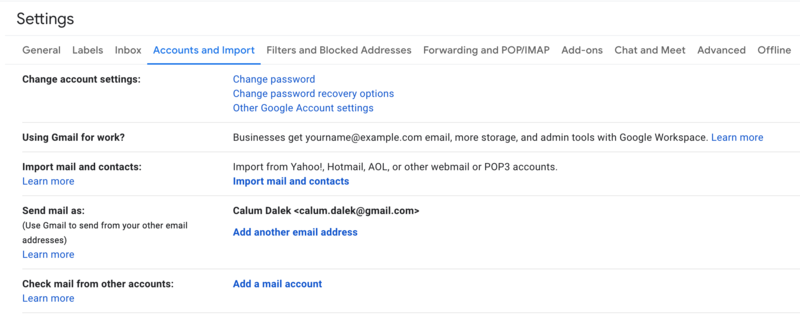
Login to Gmail, go to Settings, and then under 'Accounts and Import', click 'Add another email address'.
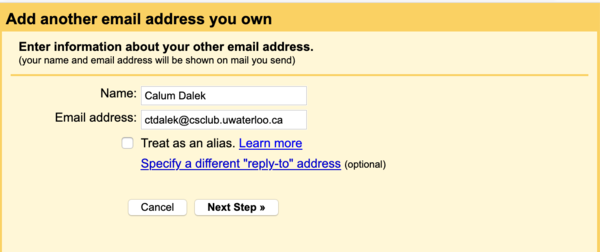
Fill in your real name and CSC email address (should be watiam_id@csclub.uwaterloo.ca). I would suggest unchecking the 'Treat as an alias' box unless you want your CSC and Gmail addresses to be treated the same. See more info here.
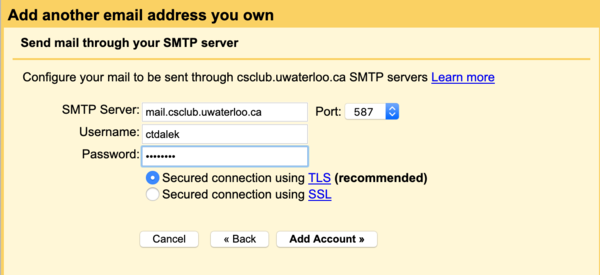
Fill in your CSC username and password:
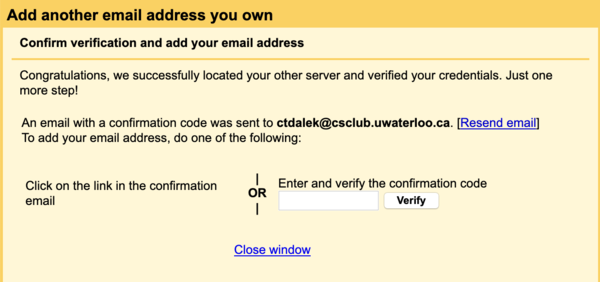
Google will send a confirmation email to your CSC address. Either click on the link in the email or enter the confirmation code.
If you return to Gmail, you should now see your CSC account under your settings. I suggest selecting the 'Reply from the same address the message was sent to' option.
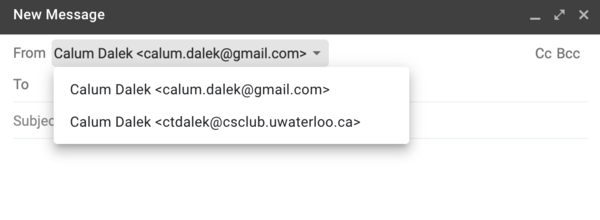
Now, if you click on the 'Compose' button on the left hand side, you should be able to select your CSC address as the sender.
If you want to receive your CSC messages via Gmail, just append your Gmail address to the end of the .forward file in your home directory on the CSC servers (it needs to be on a new line).
Outlook Desktop
This is probably the world's most powerful email client, but you need to jump through a lot of hoops to setup your CSC email with it. Luckily I've done those for you so just follow these steps:
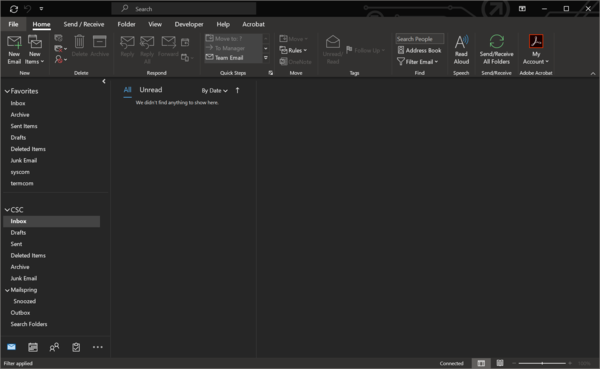
Open Outlook and click File at the top left.
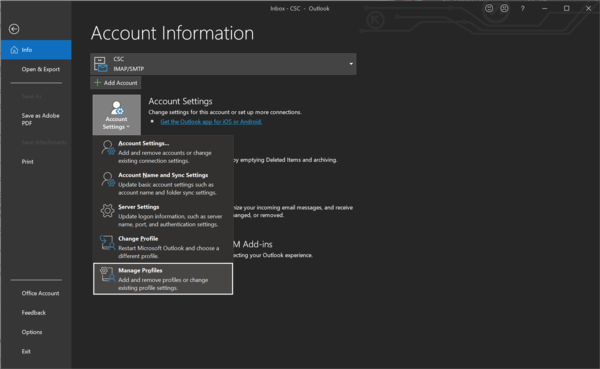
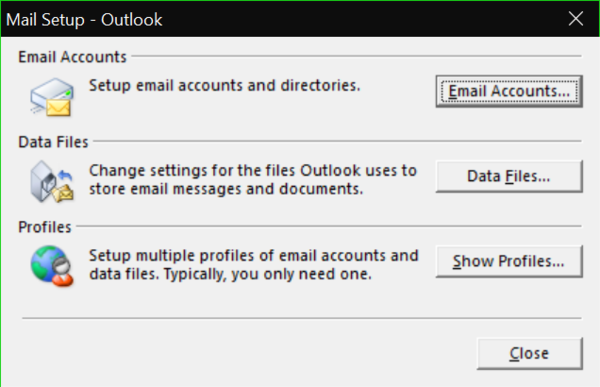
Click Account Settings and then Manage Profiles.
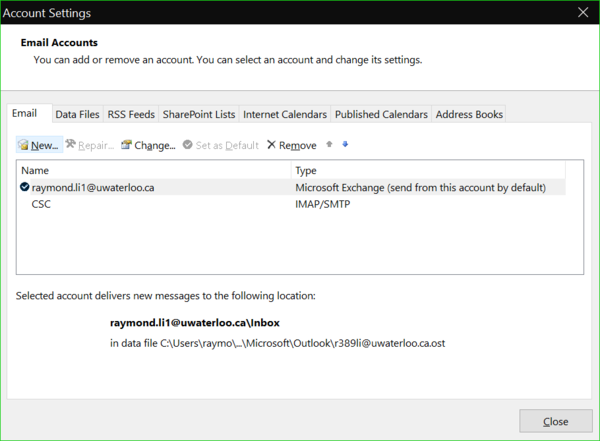
Click Email accounts...
Click New...
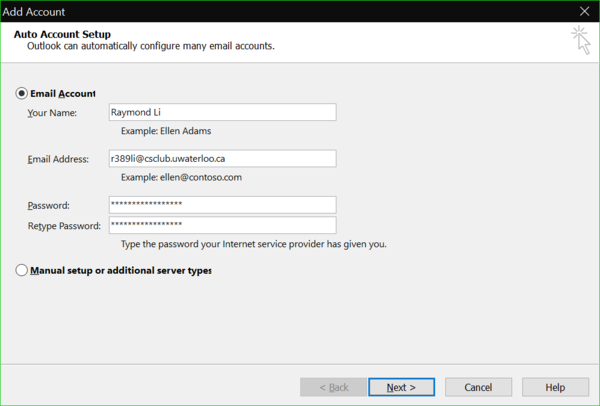
Enter your name, CSC email and password. If you have an email alias, don't use your alias, use your QuestID@csclub.uwaterloo.ca email. Click Next >
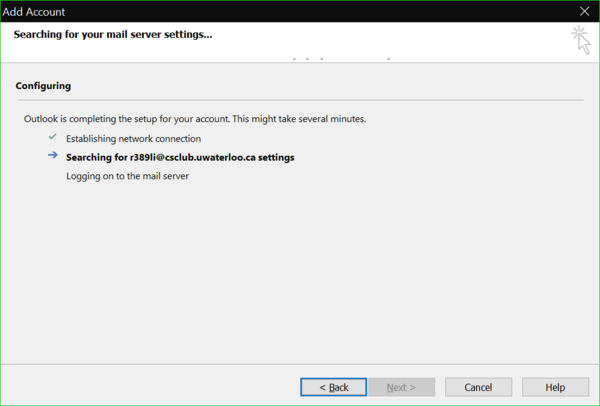
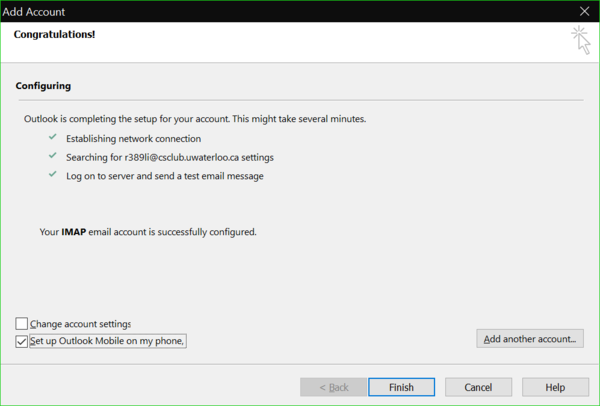
It will start searching for your account, this can take a minute or two.
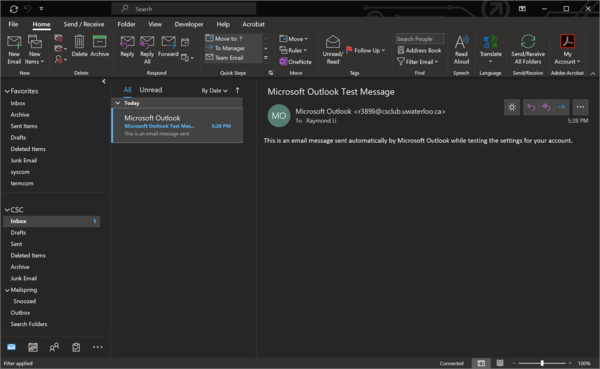
Once it finishes configuring it you'll get a test email.
Uncheck Set up Outlook Mobile on my phone (unless you want to), and check Change account settings. Then click Next >
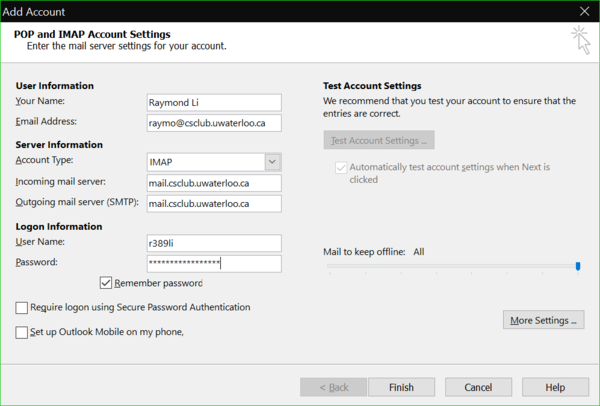
If you have an email alias, you can now change your email to that in the Email Address field. Don't change your logon info. You can click More Settings to change your mailbox name, or click Finish (setup is complete).
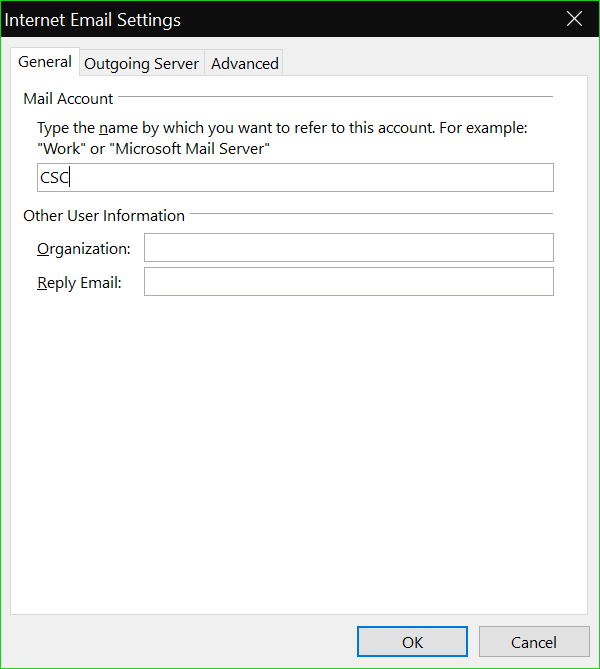
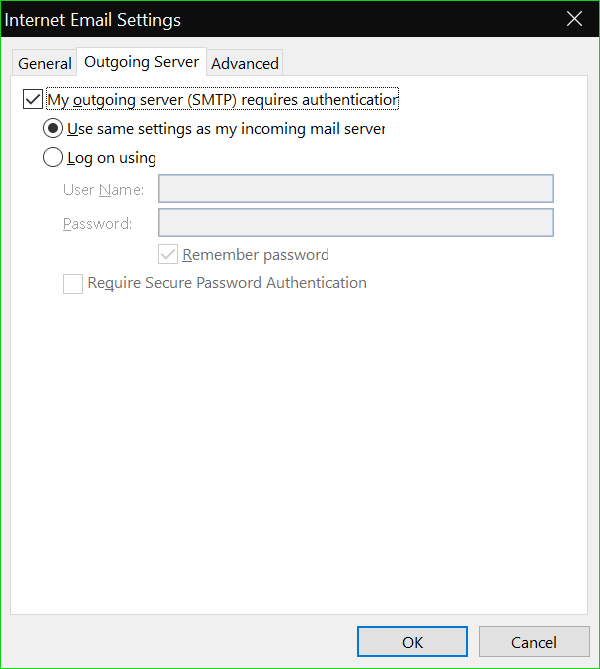
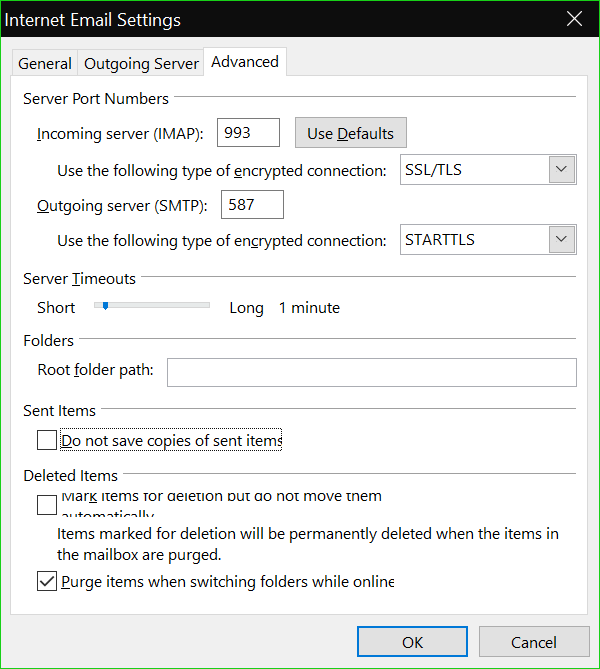
You can change the name here. That's it. I've provided the other two tabs' configs below just in case anyone (including future me) needs it.
Gnus
Gnus is one of the MUAs built into GNU Emacs. Gnus is very powerful and flexible, and comes with several "backend"s out of the box for reading newsgroups, email, RSS feeds, and more. Over the years people have written many other backends for it as well.
To get started using Gnus for reading your CSC mail over IMAPS, you can start with the following simple configuration based on Gnus's nnimap backend:
(setq mail-user-agent 'gnus-user-agent
      read-mail-command 'gnus
      gnus-select-method '(nnnil "")
      gnus-secondary-select-methods
      '((nnimap "csc"
                (nnimap-stream tls)
                (nnimap-address "mail.csclub.uwaterloo.ca")
                (nnimap-user "abandali"))))
The gnus-secondary-select-methods variable set above is the most important bit.
For reference sake, here's how we can do client-side mail splitting in Gnus: say we want to move all messages with a X-Spam-Flag header of YES to the Junk folder; here's how we tell Gnus to do that:
(setq gnus-secondary-select-methods
      '((nnimap "csc"
                (nnimap-stream tls)
                (nnimap-address "mail.csclub.uwaterloo.ca")
                (nnimap-user "abandali")
                (nnimap-inbox "INBOX")
                (nnimap-split-methods 'nnimap-split-fancy)
                (nnimap-split-fancy
                 (|
                  ;; move spam to Junk
                  ("X-Spam-Flag" "YES" "Junk")
                  ;; catch-all; leave everything else in inbox
                  "INBOX")))))
Gnus has a plethora of useful and complex features, and one cat get very fancy with it. But that is left as an exercise for the interested reader. :-)
Technical Details
Relay Server
At some point IST started enforcing that everyone use their Relay server so we did, info on how we configured it can be found here; [1]
Mail Transfer (Incoming)
Postfix is our MTA and runs on mail. Incoming mail is received inbound on smtp/25 or ssmtp/465 and goes through a sequence of filters before being delivered to users.
We are using the following filters for incoming mail, to combat spam and malware:
- zen.spamhaus.org RBL
- Greylisting with rspamd (see below)
These filters reject truckloads of spam, preventing them from reaching your inbox. Greylisting adds a delay to mail delivery from unknown servers, but after a small number of successes they will be auto-whitelisted. If that isn't good enough, ask systems-committee@csclub.uwaterloo.ca to whitelist all mail to your address.
Spam filtering
Before mail is delivered, it is sent to rspamd for spam checking. rspamd might greylist and/or add headers to the mail. rspamd WON'T reject the mail on its own. It is up to the user's filter to decide what to do based on the spam headers (usually put mails tagged as spam into a folder like Junk).
Mail Delivery
User mail is delivered by LMTP to dovecot. This is configurable by adding a comma-separated list of destinations in $HOME/.forward. See aliases(5) for more details.
Dovecot, in turn, runs the mail through user's sieve filter script (in $HOME/.maildir/sieve/ with the active filer symlink-ed to $HOME/.maildir/.dovecot.sieve). If no sieve script is found, Dovecot defaults to an internal sieve script, which pipes the mail though procmail to maintain compatibility with existing $HOME/.procmailrc scripts. You can write sieve scripts by hand, or use the graphical editor provided by https://mail.csclub.uwaterloo.ca, under Settings/Filters.
Note that procmail compatibility might be removed in the future.
Failures
If you are out of quota or another error occurs writing to your home directory, dovecot will deliver your message to /var/mail/$USER on the mail server. If that too fails, the server is probably on fire. The message will be returned to the queue where it will eventually bounce.
Sieve/ManageSieve
Dovecot also allows editing sieve scripts via ManageSieve protocol on 4190.
Forwarding
Place the following in $HOME/.forward to keep a local copy of your mail as well as forward it to some other email account. Replace ctdalek with your CSC username, but make sure the backslash stays.
\ctdalek
calumt@dalek.com
Mail Retrieval
We run Dovecot, an IMAP server. It reads messages from $HOME/.maildir, so if you have procmail deliver your mail elsewhere you will be unable to retrieve your mail using IMAP.
Mail Submission (Outgoing)
On the mail container, outgoing mail is submitted directly to Postfix via the sendmail(1) wrapper or on submission/587. Submitted mail is then queued for delivery to its destination. The other systems have no MTA and instead run sSMTP, which relays mail through the mail container immediately without any queue or daemon.
