IPMI101
Guide to IPMI (IPMI 101)
IPMI is a necessary evil. Let’s learn to make the best of it.
Setting up IPMI
- Install ipmitool
# apt-get install ipmitool
- Load IPMI modules (they are included in most upstream kernels)
You may also need a kernel module specific to your motherboard’s manufacture as some BMC/LOMs do not conform to IPMI spec and thus need a translation layer.
# modprobe ipmi_*
- Locally connect to the
/dev/ipmiinterface
# ipmitool shell
> help
> mc info
Securing IPMI
Note that root on the machine is root on the BMC and vice versa.
- User administration
(re)set the password, rename the admin account to root and delete any extra users as they can have surprising privilege. You may have to use the BMC’s web interface delete accounts.
# ipmitool shell
> user list 1
ID Name ...
2  ADMIN ...
> user set password 2
User id 2: *******
User id 2: *******
> user set username 2 root
> user disable $other_user_ids
- Disable NULL password and cipher suite 0
Note that the $channel is usually 0 but can range from 0-10 and there can be multiple NICs and so multiple channels to fix.
# ipmitool shell
> lan print $channel
> lan set $channel auth ADMIN MD5
> lan set $channel auth CALLBACK MD5
> lan set $channel auth USER MD5
> lan set $channel auth OPERATOR MD5
> lan set $channel cipher_privs XXXaXXXXXXXXXXX
> lan print $channel
Configuring networking
Note once again that there are sometimes multiple channels, to find the correct channel it is helpful to use either trial and error and/or an ARP scanner to find the correct MAC address. Usually the channel is 0 but I have seen 1, 8 and 17. Especially when there are multiple NICs.
# ipmitool shell
> lan print $channel
> lan set $channel ipsrc static
> lan set $channel ipaddr 10.15.134.?
> lan set $channel defgw ipaddr 10.15.134.1
> lan set $channel netmask 255.255.255.0
// if you have vlan tagging enabled on the switch port, useful for a shared NIC
> lan set $channel vlan id 520
Configuring Serial over LAN
To enable serial over LAN you need to ensure that it is enabled in your BIOS or EFI setup utility and further note the baud rate. 115200 is used as an example below. Note that GRUB is the only boot loader that takes input via serial properly, in my experience. Syslinux failed horribly on corn-syrup.
Paste the following into /etc/default/grub.d/99-csclub.cfg:
GRUB_CMDLINE_LINUX="console=tty1 console=ttyS1,115200n8"
GRUB_TERMINAL_INPUT="console serial"
GRUB_TERMINAL_OUTPUT="console serial"
GRUB_SERIAL_COMMAND="serial --speed=115200 --unit=1 --word=8 --parity=no --stop=1"
and then run:
// on debian based distros
// Yay, Debian magic :\
# update-grub
// on upstream packages (Arch, Fedora, etc.)
# grub-mkconfig -o /boot/grub/grub.cfg

# reboot
iDRAC
riboflavin
riboflavin is using iDRAC 6. The web console can be viewed from https://riboflavin-ipmi.csclub.uwaterloo.ca; if you are not on campus, you can use a SOCKS proxy. Unfortunately, the virtual console uses Java Web Start, which is now deprecated. Here's a workaround which you can use instead.
From the web UI, go to the "Console/Media" tab and click the "Launch virtual console" button. This will download a file whose name starts with "viewer.jnlp". Now go to https://www.java.com and download JRE 8; any later version will not have support for JWS (note that OpenJDK will not work; JWS was a proprietary framework from Sun/Oracle). Unpack the tarball, open jre1.8.0_391/lib/security/java.security in a text editor, and comment out the following properties (note that each property spans multiple lines):
- jdk.certpath.disabledAlgorithms
- jdk.jar.disabledAlgorithms
- jdk.tls.disabledAlgorithms
If you are off-campus, you will need to setup some proxying so that the Java application can access ports 443 and 5900 on riboflavin-ipmi. In the example below, I am using caffeine as a jump host, but any machine on campus should do:
ssh -L 5443:localhost:5443 -L 5900:localhost:5900 caffeine.csclub.uwaterloo.ca
Now on caffeine, open a tmux/screen session, and run the following commands in two different panes:
socat TCP-LISTEN:5443,fork TCP:riboflavin-ipmi:443socat TCP-LISTEN:5900,fork TCP:riboflavin-ipmi:5900
Back on your personal machine, open the viewer.jnlp file in a text editor and perform the following:
- Replace all instances of
riboflavin-ipmi.csclub.uwaterloo.ca:443withlocalhost:5443 - Under the
application-descelement, the firstargumentchild element should sayip=riboflavin-ipmi. Replace this withip=localhost.
- Under the
application-descelement, there are childargumentelements foruserandpasswd. For some reason these are set to numbers; set these to the username and password for IPMI (username should beroot).
Now run:
jre1.8.0_391/bin/javaws viewer.jnlp
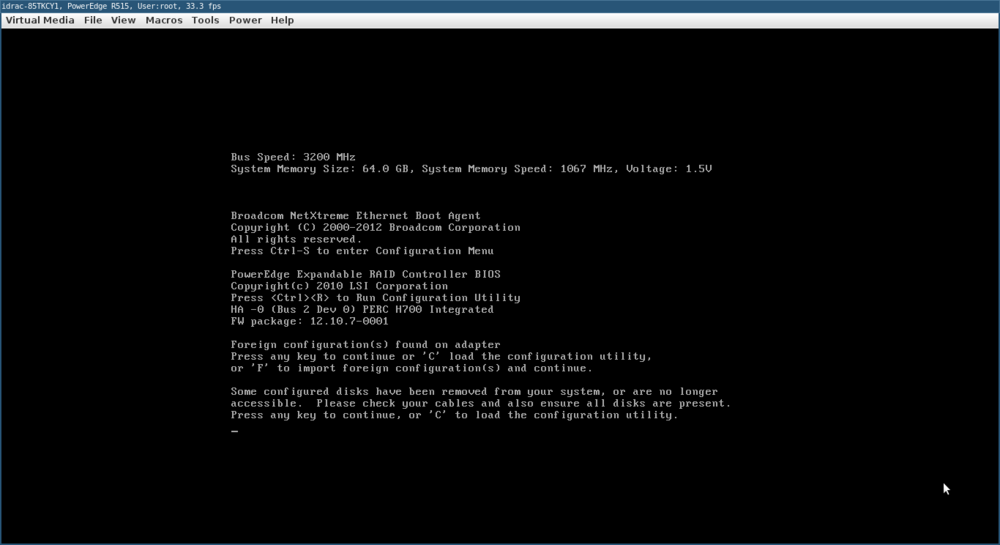
If all goes well, the virtual console should eventually appear:

carbonated-water
carbonated-water is also using iDRAC 6, but seems to have some kind of TLS certificate configuration which prevents modern browsers from loading its web UI. So we're going to run an old version of Firefox inside a Podman container instead:
podman run --name firefox -it -e DISPLAY --net=host -v $XAUTHORITY:/root/.Xauthority -v /tmp/.X11-unix:/tmp/.X11-unix debian:9-slim bash
sed -i 's/deb\.debian\.org/archive.debian.org/' /etc/apt/sources.list
sed -i 's/security\.debian\.org/archive.debian.org/' /etc/apt/sources.list
sed -i '/stretch-updates/d' /etc/apt/sources.list
apt update
apt install firefox-esr
firefox
Next, follow the instructions here to set up a SOCKS proxy: How to SSH#SOCKS proxy
Now visit https://carbonated-water-ipmi.csclub.uwaterloo.ca from Firefox, login using the IPMI credentials, and download the JNLP file. Copy it from the Podman container to your computer (replace "viewer.jnlp" with the full file name):
podman cp firefox:/root/Downloads/viewer.jnlp launch.jnlp
Follow the same steps as done for riboflavin to edit the JDK settings and JNLP file. In addition, there are a few more settings which we need to tweak:
- Run
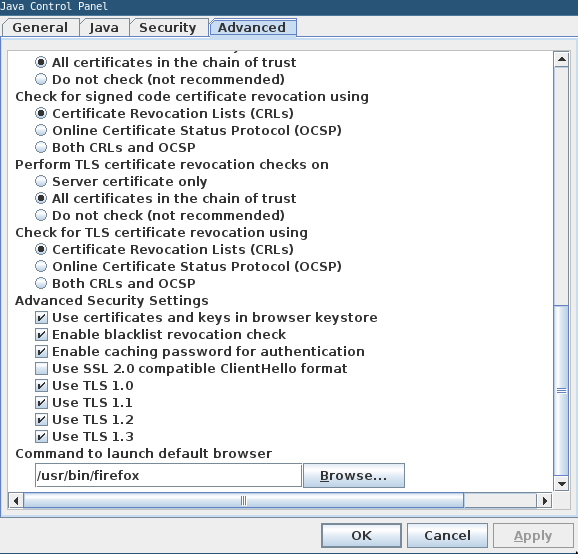
jre1.8.0_391/bin/ControlPanel, go to the Advanced tab, scroll down and check "TLS 1.0" and "TLS 1.1" - We also need to disable OCSP. In the same window, set "Check for signed code certificate revocation using" to "Certificate Revocation Lists (CRLs)" and set "Check for TLS certificate revocation using" to "Certificate Revocation Lists (CRLs)" (see here for the reference).
Now you can launch the JNLP file as usual.
Supermicro
ginkgo
To access the virtual console on ginkgo, the steps are the same as those for riboflavin, with the following changes:
- In the launch.jnlp file, in the root
<jnlp>tag, change the value of thecodebaseattribute fromhttps://ginkgo-ipmi.csclub.uwaterloo.ca:443tohttps://localhost:5443. Next, in the first<argument>element under<application-desc>, replaceginkgo-ipmi.csclub.uwaterloo.cawithlocalhost. These are the only changes which you should make to this file (unless you are already on the campus network, in which case you do not need to modify this file at all). - Run
jre1.8.0_391/bin/ControlPanel, go to the Security tab, click "Edit Site List", and addhttps://ginkgo-ipmi.csclub.uwaterloo.caas an exception.
